How To Overwrite or Add To Magento Core Files

There are some situations when you may need to change the way Magento core files work. But you must do it the right way, you can’t just start editing files in app/code/core/.

Why shouldn’t you edit core files directly?

To put it in simple terms: so you can install updates. If you change the core files directly, and then at some future date decide to install a Magneto update the you run the risk of losing all of the changes that you made as the core files are completely overwritten by updates.

So what is the right way to change core files?

The correct way to make changes to core files is to overwrite the parts that you want to change and put it in your local codebase in

app/code/local/

(or in the case of community extensions, it would go in

app/code/community/

).

A Step by step example using the

Mage_Sales_Model_Quote

class in Magento’s core

  1. Locate the file and copy the file path into your local directory.

    In our example, the location of our file in the core is

    app/code/core/Mage/Sales/Model/Quote.php

    . We need to copy everything after the core directory, that would be

    Mage/Sales/Model/Quote.php

    , and build the same structure in our local namespace directory. If our local namespace is “Mywebsite” then our new file path would be

    app/code/local/Mywebsite/Mage/Sales/Model/Quote.php

    .

  2. Create a class to extends the core class.

    In our newly created file, we need to create a class that extends the core class. Just like all Magento classes, our new class name needs to match the file path. Since our file path is

    app/code/local/Mywebsite/Mage/Sales/Model/Quote.php

    then our new class name would be

    Mywebsite_Mage_Sales_Model_Quote

    . Our new class must extend the core class we want to change, it should look something like this:

    class Mywebsite_Mage_Sales_Model_Quote extends Mage_Sales_Model_Quote {
       //do something here
    }
    
  3. Write your changes in the new class.

    Now that you have the new class, you can add a new method or change an existing method. In our case, we want to change the

    setHasError()

    method in the core class so that it logs an exception whenever an error is set on a quote. In order to do that, we will start by copying the original method and pasting it in our new file. Once it is in our new file, we will replace the code inside the method with

    parent::

    followed by the method we are changing, be sure to include any parameters. Doing this will ensure the the original method in the core class will still run as intended. Our class now looks like this:

    class Mywebsite_Mage_Sales_Model_Quote extends Mage_Sales_Model_Quote {
    
        public function setHasError($flag)
        {
            parent::setHasError($flag);
        }
    }
    

    Now we are going to add our custom code that will throw the exception that we want before it runs the original method:

    class Mywebsite_Mage_Sales_Model_Quote extends Mage_Sales_Model_Quote {
    
        public function setHasError($flag)
        {
            try {
                if ($flag) {
                    Mage::throwException(Mage::helper('queue')->__('Quote '.$this->getId().' Has Error Exception'));
                }
            } catch (Exception $e) {
                Mage::logException($e);
            }
            parent::setHasError($flag);
        }
    }
    
  4. Create a config file for your new class

    We are almost done! Just one more important part to go: we have to tell Magento about our new class. To do that we need to create a

    config.xml

    in the

    app/code/local/Mywebsite/Mage/etc/

    directory.

    In this new file we need to put the following lines:

    <config>
        <global>
            <models>
                <sales>
                    <rewrite>
                        <quote>Mywebsite_Mage_Sales_Model_Quote</quote>
                    </rewrite>
                </sales>
            </models>
        </global>
    </config>
    

    This tells Magento that we want to use our new class instead of the one in the core files. Our changes won’t work without this step.

  5. Clear the cache and test the changes

    Now we just need to clear Magento’s cache and if we did everything right then our changes should start working!
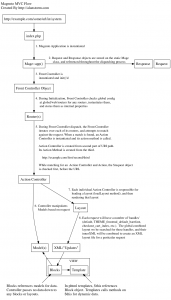
Magento’s MVC Framework

In order to address the most common complaints about the generally understood MVC framework pattern, Magento’s MVC pattern has been customized to be more abstract and thus more flexible.

The pattern of Magneto’s MVC framework goes something like this:

  1. A URL is intercepted by a single PHP file
  2. This PHP file instantiates a Magento application
  3. The Magento application instantiates a Front Controller object
  4. Front Controller instantiates any number of Router objects (specified in global config)
  5. Routers check the request URL for a “match”
  6. If a match is found, an Action Controller and Action are derived
  7. Action Controller is instantiated and the method name matching the Action Name is called
  8. This action method will instantiate and call methods on models, depending on the request
  9. This Action Controller will then instantiate a Layout Object
  10. This Layout Object will, based on some request variables and system properties (also known as “handles”), create a list of Block objects that are valid for this request
  11. Layout will also call an output method on certain Block objects, which start a nested rendering (Blocks will include other Blocks)
  12. Each Block has a corresponding Template file. Blocks contain PHP logic, templates contain HTML and PHP output code
  13. Blocks refer directly back to the models for their data. In other words, the Action Controller does not pass them a data structure

The always generous Alan Storm has provided a useful diagram to help us visualize this process:
Magento MVC flow chart

This custom MVC pattern allows developers more flexibility to add more models and views for custom modules.

Again, thanks to Alan Storm for the wealth of knowledge that has made this post possible.

Understanding the Generic MVC Framework

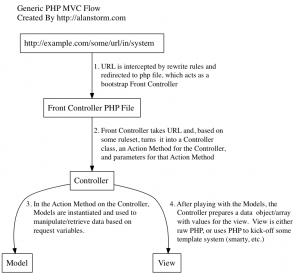
The MVC framework is really common but was difficult for me to understand at first. I found an excellent explanation of how it works from Alan Storm:

  1. A URL is intercepted by a single PHP file (usually called a Front Controller)
  2. This PHP file will examine the URL, and derive a controller name and an action name (a process that’s often called routing)
  3. The derived controller is instantiated
  4. The method name matching the derived action name is called on the controller
  5. This action method will instantiate and call methods on models, depending on the request variables
  6. The action method will also prepare a data structure of information, which is passed on to the view
  7. The view then renders HTML, using the information in the data structure it has received from the controller

Alan even provided a diagram to help visualize the process:
MVC flow chart

I hope this helps anyone who is having a difficult time understanding the MVC framework! Magento’s MVC pattern is a bit different, if you would like to learn how that one works then head over to my post about how Magento’s MVC framework works.

The Magento Config

What happens to all of the xml configuration files that are required for all modules, classes, and just about anything you want to do with Magento? Well, they all get added to the Magento Config. The Magento Config is basically just one large xml file that acts as the brain of your Magento installation. Whenever you load a model, singleton, helper, block, or anything within Magento, the Magento Config is how Magento knows where to find it.

This is an excellent explanation of how it works by Alan Storm:

“In plain english, the static helper method will:
Look in the <helpers /> section of the Config.
Within <helpers />, look for a <sales /> section
Within the <sales /> section look for a <class /> section
Use the base class name found in #3 (Mage_Sales_Helper) to construct a full class name Mage_Sales_Helper_Data”

To easily access the entire Magento Config, you can insert the following code into any page or class and it will display on the page when it loads:

die(Mage::app()->getConfig()->getNode()->asXML());

From there you can find anything that is available to Magento and use it!

Credit to Alan Storm.

Installing Java on Ubuntu

Since Java is proprietary software, Ubuntu is unable to include it in their repositories. The version of Java (IcedTea) that is in the Ubuntu repositories is a repackaged older version of Java. Because of this, you will never have the most up to date version of Java if you stick with the one provided by Ubuntu.

That being said, you can still get the most up to date version of Java by adding the Java repository and installing with aptitude using this tutorial.

Loading Magento Frontend in Server Crontab

Disclaimer: This is not best practices, use the Magento cron system whenever possible. This method should only be used when working on legacy systems that use the server crontab.

Any event observers set in the frontend or adminhtml typically won’t fire when a server crontab processes a scheduled job. Any easy solution for this is to load the area where the event is set in your cron file. Do this by using

Mage::app()->loadArea(Mage_Core_Model_App_Area::AREA_XXXX)

. You can load any of the areas specified in the

Mage_Core_Model_App_Area

class. Loading the area where the event is set will fire any events that are set for that same area.

Example using the frontend in cronfile.php:

"require dirname(__FILE__) . '/../app/Mage.php';

if (!Mage::isInstalled()) {
    echo "Application is not installed yet, please complete install wizard first.";
    exit;
}
set_time_limit(180);
error_reporting(E_ALL & ~E_DEPRECATED);

$_SERVER['SCRIPT_NAME'] = str_replace(basename(__FILE__), 'index.php', $_SERVER['SCRIPT_NAME']);
$_SERVER['SCRIPT_FILENAME'] = str_replace(basename(__FILE__), 'index.php', $_SERVER['SCRIPT_FILENAME']);
Mage::app('admin')->setUseSessionInUrl(false);

// Magic happens here
Mage::app()->loadArea(Mage_Core_Model_App_Area::AREA_FRONTEND);

try {
    // Do your cron job stuff here
} catch (Exception $e) {
    // if it breaks
}"

Unique Messages in Magento

Magento allows you to create unique messages that won’t be duplicated if it gets called multiple times. You do this by using the

addUniqueMessages()

function in any session.

Example of a unique error message:

// this creates the error message using the 'core/message' model
$message = Mage::getModel('core/message_error', Mage::helper('checkout')->__('Oops, you did something wrong!'));
// setting the unique error message in th core session so it won't get duplicated
Mage::getSingleton('core/session')->addUniqueMessages($message);

Credit to Marius.

Magento Events Scope

Event observers in your module can be used in three different scopes in your Magento store: frontend, adminhtml, and global.

Here is how each one looks in your config.xml file:

<config>
    <frontend>
        <events>
            ...
        </events>
    <frontend>
    <adminhtml>
        <events>
            ...
        </events>
    <adminhtml>
    <global>
        <events>
            ...
        </events>
    <global>
</config>

Observers in the frontend section will only get triggered when the event is fired from the frontend of the Magento store. Any events fired form the admin area will ignore the observers in this section.

Observers in the adminhtml section will only get triggered when the event is fired from the admin area of Magento. Likewise, any events fired form the frontend of the site will ignore the observers in this section.

Lastly, observers in the global section will get triggered no matter where the event was fired from.

The credit for this post goes to prattski.com, thanks for the help.

How to Only Show Posts from a Single Category on WordPress

WordPress provides a very simple way for you to show blog posts on a single category. Just apply the following code where you want to display the posts:

query_posts('cat=1');
while (have_posts()) : the_post();
    the_content();
endwhile;

Just replace the “1” in cat=1 with the correct category ID and it is good to go.

For more details check this page.